How to Install Heated Floors on Concrete: A Complete Guide
Heated floors provide a luxurious and cozy experience, especially during the colder months. If you have a concrete subfloor, installing in-floor heating can be a viable and highly effective option to add warmth to your living spaces. In this detailed guide, we’ll take you through the process of installing heated floors on concrete, from preparation to installation, providing you with essential tips for a successful and energy-efficient outcome.
Step 1: Choose the Right In-Floor Heating System
The first step in the process is selecting the appropriate in-floor heating system for your space. There are two primary types of in-floor heating systems: electric and hydronic radiant heating.
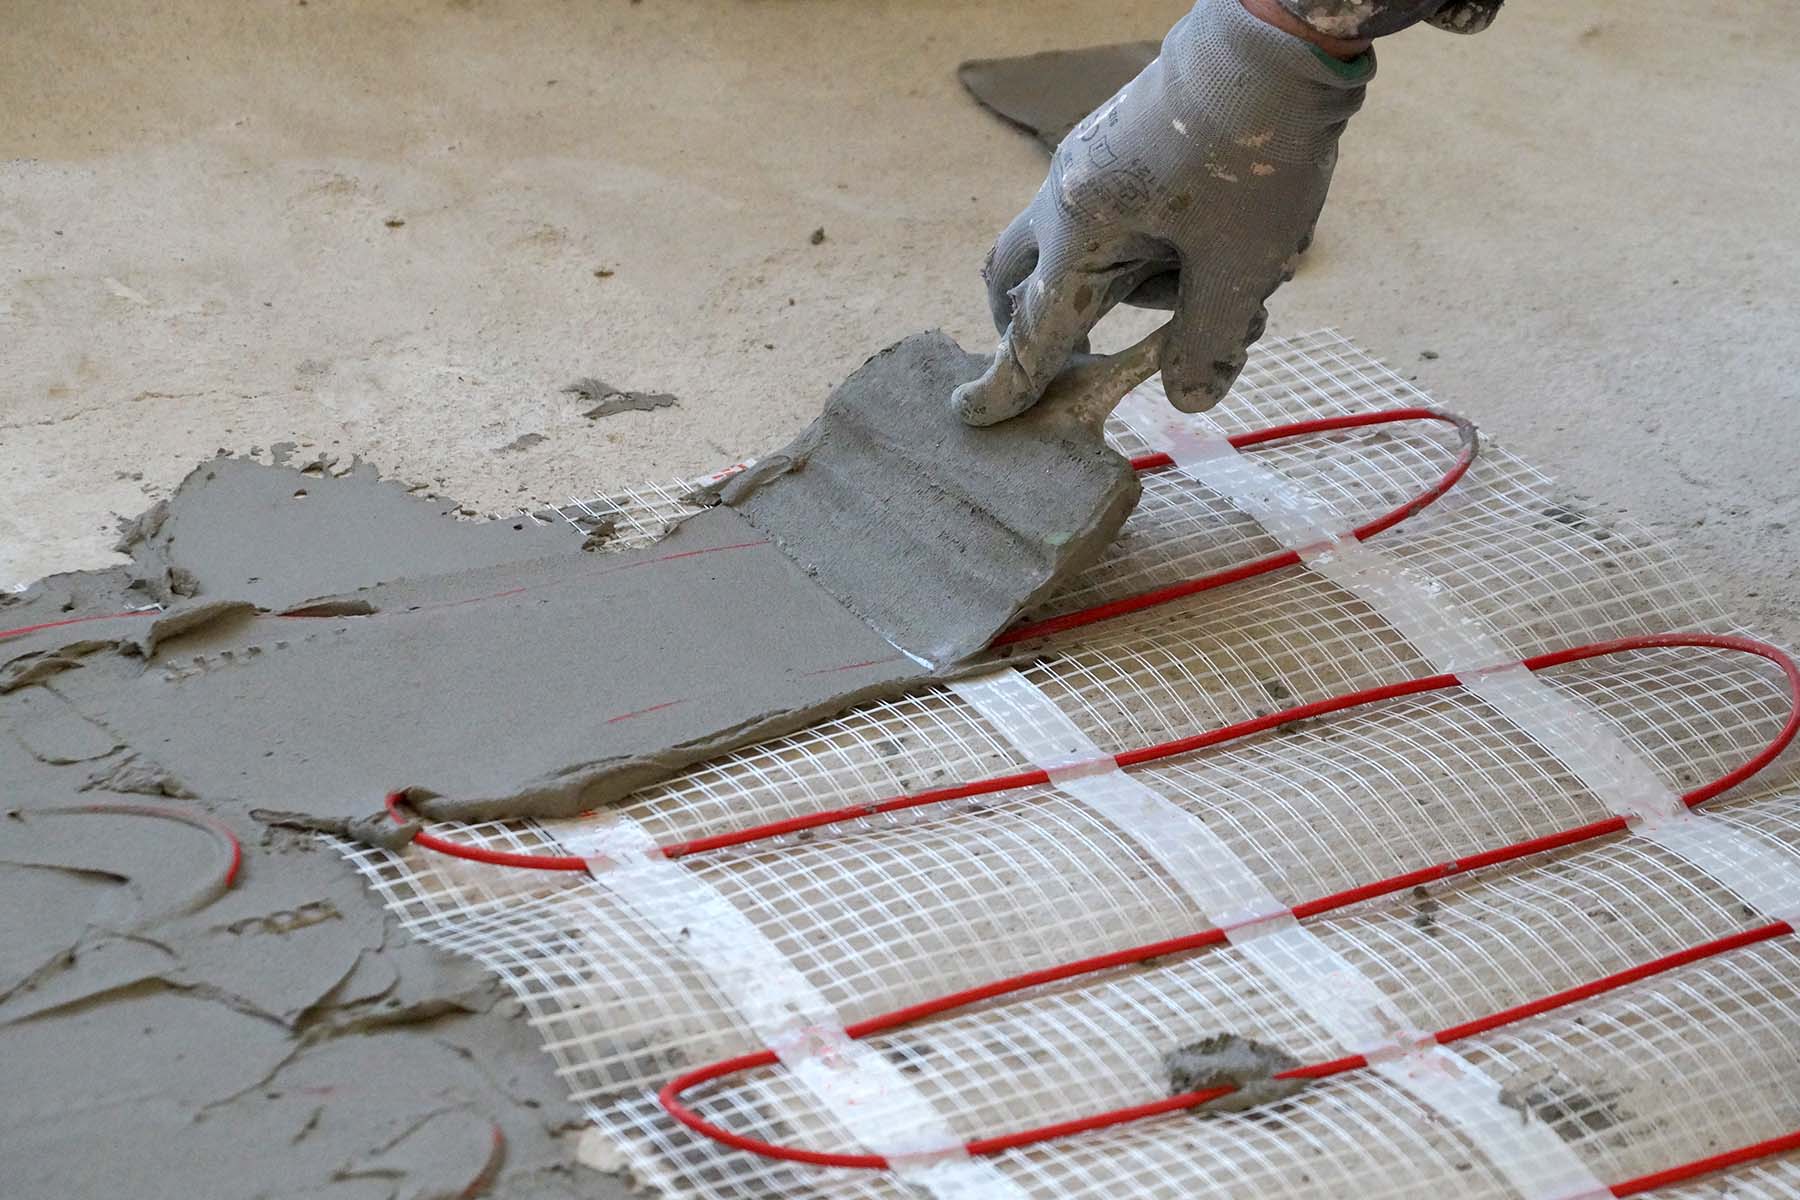
Electric radiant heating systems are made up of heating cables or mats installed directly onto the concrete subfloor. These systems are relatively easy to install and are compatible with a wide range of flooring types, including tile, stone, and engineered wood. They are a great choice for smaller spaces or rooms that don’t require constant heating.
On the other hand, hydronic radiant heating systems use hot water tubes or pipes embedded in the concrete to distribute warmth. These systems are often preferred for larger spaces and are more energy-efficient in the long run. Hydronic heating systems work well with various floor coverings, but they generally require professional installation and are more complex to set up.
Step 2: Prepare the Concrete Subfloor
Before installing the heating system, it’s crucial to properly prepare the concrete subfloor. Begin by thoroughly cleaning the surface, ensuring it is free from debris, dust, and imperfections. A clean and smooth surface will allow for better installation and improve the efficiency of the heating system.
If your concrete subfloor has moisture issues, address them before proceeding with the installation. Moisture can damage the heating system, leading to costly repairs. If necessary, use a moisture barrier or vapor retarder to prevent moisture from seeping through the concrete.
Next, level the concrete surface to ensure a smooth, even foundation for the heating system. If there are any uneven areas, use a self-leveling compound to create a flat surface. This will ensure the heating system is installed correctly and will operate efficiently.
Step 3: Install the In-Floor Heating System
With your concrete subfloor prepared, it’s time to install the heating system.
For electric radiant heating systems, start by laying out the heating cables or mats according to the manufacturer’s instructions. Ensure that the cables or mats are evenly spaced and cover the entire area where you want heat. Secure the heating elements to the concrete using adhesive or tape to keep them in place during the flooring installation. For added efficiency, consider adding an insulation layer over the heating system. This will help direct heat upwards, improving the system’s performance.
If you’re opting for a hydronic radiant heating system, it’s best to hire a professional for the installation. This system requires laying pipes or tubes in the concrete subfloor and connecting them to a boiler or water heater. Professional installation ensures the system is set up correctly and safely.
Step 4: Flooring Installation
Once the heating system is in place, it’s time to install the flooring. The type of flooring you choose will depend on the heating system and the look you’re going for.
For tile or stone flooring, apply a layer of thin-set mortar over the heating system, ensuring that the heating elements are fully covered. Press the tiles or stones into place, being careful to avoid air gaps that could cause uneven heating.
If you’re installing wood or laminate flooring, use a suitable underlayment over the heating system to provide additional insulation and protection. Follow the manufacturer’s guidelines for installing wood or laminate flooring over heated floors to ensure optimal performance.
For carpet or vinyl flooring, use carpet padding or another suitable underlayment to create a comfortable and efficient heating experience. Then, install the carpet or vinyl flooring following standard installation practices.
Step 5: Thermostat and System Setup
The final step in the installation process is setting up the thermostat. Place the thermostat in a convenient location where it can be easily accessed to control the temperature of your heated floors. Carefully follow the manufacturer’s instructions to wire and program the thermostat, ensuring that it is correctly calibrated for optimal performance.
Before you begin using your heated floors on a regular basis, it’s important to perform a system test. This will allow you to ensure that the heating system is functioning correctly and that your floors are heating evenly. If necessary, make any adjustments to the thermostat settings to achieve the desired level of warmth and comfort.
Final Thoughts
Installing heated floors on concrete offers a luxurious touch that enhances the comfort and appeal of your home. By carefully choosing the right heating system, properly preparing the subfloor, and following the correct installation methods, you can enjoy the benefits of cozy, energy-efficient heated floors year-round. Whether you opt for electric radiant heating or hydronic systems, the result will be a warm, inviting space that elevates the comfort of your home.